Comparisons
AVIF vs WebP: Which Should You Use?
AVIF vs WebP is not a contest between old and new. It is a workflow decision about efficiency, compatibility, and how much complexity your stack can support.

The short answer
If your team wants a straightforward modern default, WebP is usually easier to operationalize. If you are actively optimizing media pipelines and compatibility is covered, AVIF can be the more aggressive choice.
Where AVIF wins and where WebP stays practical
AVIF can deliver stronger compression gains in many cases, especially for photo-heavy web assets. WebP stays practical because it is widely supported, easier to work with, and already strong enough for many real publishing needs. That means AVIF is often a performance-forward option, while WebP is the safer operational default.
The best choice depends on whether the site is ready to support AVIF cleanly across tooling, browser needs, testing, and editorial workflows.
- AVIF for stronger compression when the stack is ready for it.
- WebP for a simpler, broadly practical modern default.
Real examples
A media-heavy landing page may benefit from AVIF if the pipeline supports it cleanly. A CMS with mixed contributor workflows may find WebP easier to manage consistently. A screenshot library may need a different decision than a photo-heavy hero library.
How it affects SEO and page speed
Both formats can support faster pages, but only when the implementation is stable and the rest of the image workflow is disciplined.
Developer and workflow notes
Teams should choose the format their pipeline can support predictably, not just the one with the strongest benchmark headline.
Common mistakes to avoid
- Choosing AVIF before verifying actual browser and workflow support.
- Assuming WebP is outdated because AVIF exists.
- Ignoring dimension and crop discipline while debating the last few compression gains.
- Treating all content types as if they benefit equally from the same modern format.
Encoder settings that decide the actual file size
The format matters less than the knobs you set. WebP runs two engines: VP8 lossy and VP8L lossless. For photographic content, lossy WebP at quality 75 to 82 lands most 1600 px hero images between 40 KB and 120 KB. Push below quality 70 and you get visible blocking in skies and skin gradients because WebP is locked to 8-bit color (256 levels per channel).
AVIF rides the AV1 codec and is controlled by a CRF-style quantizer, not a 0 to 100 quality slider. Most AVIF encoders map roughly quality 50 to 63 to a quantizer that produces the same 1600 px hero at 25 KB to 70 KB, about 30 to 50 percent smaller than the matched WebP. The real advantage shows on gradients: AVIF encodes 10-bit and 12-bit internally, so a sunset or a soft drop shadow that bands in 8-bit WebP stays smooth in AVIF even at the same target weight.
Watch chroma subsampling on graphics with hard colored edges. Both formats default to 4:2:0, which halves color resolution and fringes 1 px red text on black or sharp logo outlines. Set AVIF to 4:4:4 for screenshots, UI captures, and text-over-image; the file grows 15 to 30 percent but the edges stay clean. For pure photos, 4:2:0 is correct and you keep the smaller size.
Capability ceilings: what each format physically supports
Pick based on hard limits, not vibes. These are the spec boundaries that break a workflow when you exceed them, and the cases where one format simply cannot do what the other does.
- Maximum dimensions: WebP caps at 16383 x 16383 px. AVIF handles up to 65536 x 65536 px through tiling, so panoramas and 8K product zoom assets that overflow WebP fit in AVIF.
- Color depth: WebP is 8-bit only (256 levels per channel). AVIF supports 8, 10, and 12-bit, which is what kills banding in gradients and enables HDR.
- HDR and wide gamut: AVIF carries PQ and HLG transfer functions plus Rec. 2020 primaries. WebP has no HDR path and assumes sRGB.
- Transparency: both support a full 8-bit alpha channel, so either replaces a transparent PNG cleanly.
- Animation: both encode multi-frame clips, but a 480 px animated AVIF is routinely 40 to 60 percent smaller than the same WebP, making AVIF the better GIF replacement when decode support is in place.
- Encode speed: WebP encodes in roughly 50 to 200 ms per web-sized image. AVIF at comparable effort takes 1 to 8 seconds, which is why batch jobs of thousands of images often stay on WebP.
A sized conversion checklist for a product or blog image
Run this exact sequence when converting a source PNG or JPG for the web. The numbers assume a standard content image displayed at 800 px wide on desktop. Use JPG to AVIF or PNG to WebP for the format step and Compress Image to hit the final byte target.
- Resize first: export at 1600 px wide (2x for Retina) before any format change. Converting a 4000 px original wastes encode time and inflates the file.
- Strip metadata: remove EXIF, GPS, and color-profile bloat, which can add 30 to 80 KB to a phone photo before a single pixel is encoded.
- Encode WebP at quality 80 as your baseline; expect 60 KB to 110 KB for a 1600 px photo and confirm no banding in flat areas.
- Encode AVIF at quality 55 to 60 for the same image; expect 35 KB to 70 KB. If it lands above the WebP version, drop quality by 5 and re-check.
- Set a hard budget: keep above-the-fold content images under 100 KB and total page image weight under 1 MB so Largest Contentful Paint stays under 2.5 seconds on 4G.
- Ship both with a fallback: serve AVIF first, WebP second, JPG last in a picture element so a browser that cannot decode AVIF never gets a broken image.
- Spot-check at 100 percent zoom on text, logos, and gradients, not the thumbnail, because subsampling and banding artifacts only appear at full resolution.
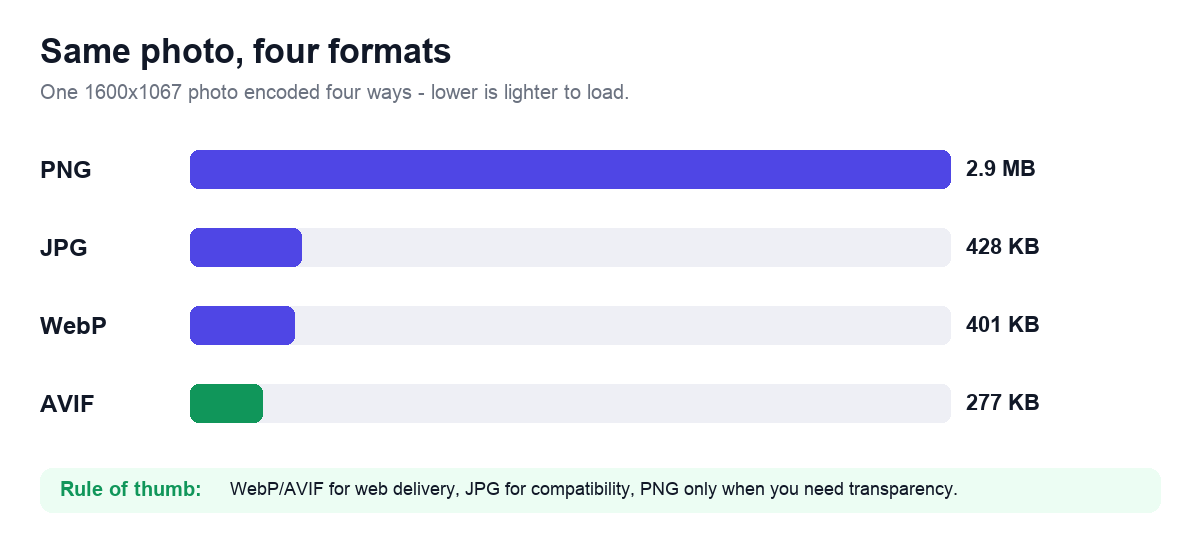
Worked example: the same photo at matched quality
Numbers settle the AVIF-vs-WebP debate faster than benchmarks. Take a 2000x1333 travel photo and export it at visually matched quality from the same source. WebP at quality 80 lands near 180 KB; AVIF at quality 50 (its scale runs darker, so 50 there roughly matches JPG 80) lands near 110 KB — about 40% lighter for an indistinguishable result at 100% zoom.
The catch is not quality, it is workflow cost. The AVIF encode took noticeably longer in the browser, and to serve it safely you still need a WebP or JPG fallback for any embedded or locked-down browser that cannot decode AVIF. The honest rule from this test: reach for AVIF on the one or two largest images on a page where 70 KB of savings actually moves Largest Contentful Paint, and let WebP stay the default for the rest of the gallery where the extra complexity is not worth it.
Tools that help
Once you have picked a format, finish the job in your browser: convert the file, resize it to the layout you actually need, and compress it to a realistic weight with the tools below.