Workflows
How to Compress a Passport Photo for Online Forms
Passport-photo uploads fail most often because the file is larger than the form allows or because the dimensions and format do not match the instructions.

What you are really solving
How to Compress a Passport Photo for Online Forms sounds simple, but the real task is meeting a strict online-form requirement while keeping the photo acceptable and readable — so the first move is to identify the destination (blog post, online form, CMS, email, ad platform, or messaging app) before touching any settings.
Step by step
Keep the guesses low: inspect the file, decide what the destination actually needs, then resize or compress in small, deliberate steps instead of re-exporting at random until it finally fits.
- Read the form instructions for dimensions, format, and file-size limits.
- Resize the photo to the required dimensions before compressing further.
- Use a compatible format such as JPG unless the form says otherwise.
- Preview the final file to make sure the face remains clear and the background still looks acceptable.
Settings that usually work
Passport-photo forms usually respond best to correct dimensions first and moderate JPG compression second.
Example scenarios
An exam application portal with a photo size cap. A government site that wants exact dimensions and a JPG upload. A visa or ID workflow where the background and face framing must remain clear.
How it affects SEO and page speed
The same discipline used for forms also improves general website image preparation: match the destination, then optimize deliberately.
Developer and workflow notes
Teams building upload forms should document exact image requirements clearly so users do not guess at settings.
Common mistakes to avoid
- Compressing before checking the required dimensions.
- Using the wrong file format for the form.
- Pushing compression so far that facial details become unreliable.
- Ignoring the form instructions and hoping the portal will accept a close-enough upload.
Exact specs for the four portals people fail on most
Read these as the upper and lower bounds the portal enforces, not suggestions. A file that is one pixel under the minimum or one kilobyte over the cap is rejected by the validator before a human ever sees it. Resize to the target pixel box first, then compress to land inside the KB window. These were the live 2026 specs at the time of writing; confirm against the portal before you submit, because departments revise them.
- US online passport renewal: square image, 600x600 px minimum to 1200x1200 px maximum, JPEG, PNG, HEIC or HEIF accepted, file between 54 KB and 10 MB, 300 DPI, head 50 to 69 percent of frame height.
- US DS-160 visa application: square 600x600 to 1200x1200 px, JPEG only, hard maximum of 240 KB, so you compress harder here than for renewal.
- UK HMPO online passport: portrait 7:9 aspect, 600x750 px minimum to 900x1125 px maximum, JPEG, 50 KB to 10 MB, light grey or cream background, chin-to-crown height 29 to 34 mm.
- India UPSC and most exam portals: JPG only, 4x5 cm at roughly 350x350 to 1000x1000 px, file 20 KB to 200 KB, white background, name and date printed across the bottom strip; the matching signature is a separate 20 to 100 KB JPG.
Hitting a KB cap without wrecking the face
File size is driven by two independent levers: pixel count and JPEG quality. Cut pixels first. A 12-megapixel phone photo is roughly 4000x3000 px and 3 to 6 MB; downscaling to a 600x750 px passport box removes about 97 percent of the pixels and usually drops the file under 200 KB before you touch quality at all. Only after the photo is at target dimensions should you lower JPEG quality.
On the quality slider, 85 to 90 percent is visually lossless for a face and is the right starting point. Drop to 75 to 80 percent to clear a tight cap; below 65 percent, 8x8 JPEG blocks appear around the eyes, hairline and shirt collar, and the US validator outright rejects anything past its 20:1 compression ceiling. To hit a fixed limit like the UPSC 20 to 200 KB window or a 240 KB DS-160 ceiling, hold dimensions constant and step quality down in increments of 5 until the file lands just inside the cap rather than slamming it to the floor. When the target is a single hard number, Compress to 50KB iterates the quality value for you so you are not re-exporting by hand.
Format and DPI traps that cause silent rejections
JPG is the only format every portal accepts, which is why it is the safe default; PNG and HEIC are accepted in fewer places. Never save a passport photo as PNG to upload: PNG is lossless and a 600x750 px portrait runs 700 KB to 1.5 MB, several times a JPG of the same photo, so it blows past KB caps for no quality gain. If your source is an iPhone HEIC, convert it to JPG before resizing, because portals that list JPEG only will reject the .heic even when it looks identical.
DPI on a digital upload is metadata, not pixels. A 600x600 px file is 600x600 px whether the header says 72 or 300 DPI; what the US 300 DPI rule actually means is 600 px across a 2x2 inch print. Re-saving to change the DPI number without changing pixel dimensions does nothing for a validator that checks pixels. Two more rejection causes: a CMYK color profile instead of sRGB, which shifts skin tones and trips some checkers, and the wrong background, where US and India expect plain white but UK HMPO requires light grey or cream. Match the background the destination names rather than reusing a social-profile crop.
Worked example: a 4.1 MB phone selfie under 50 KB
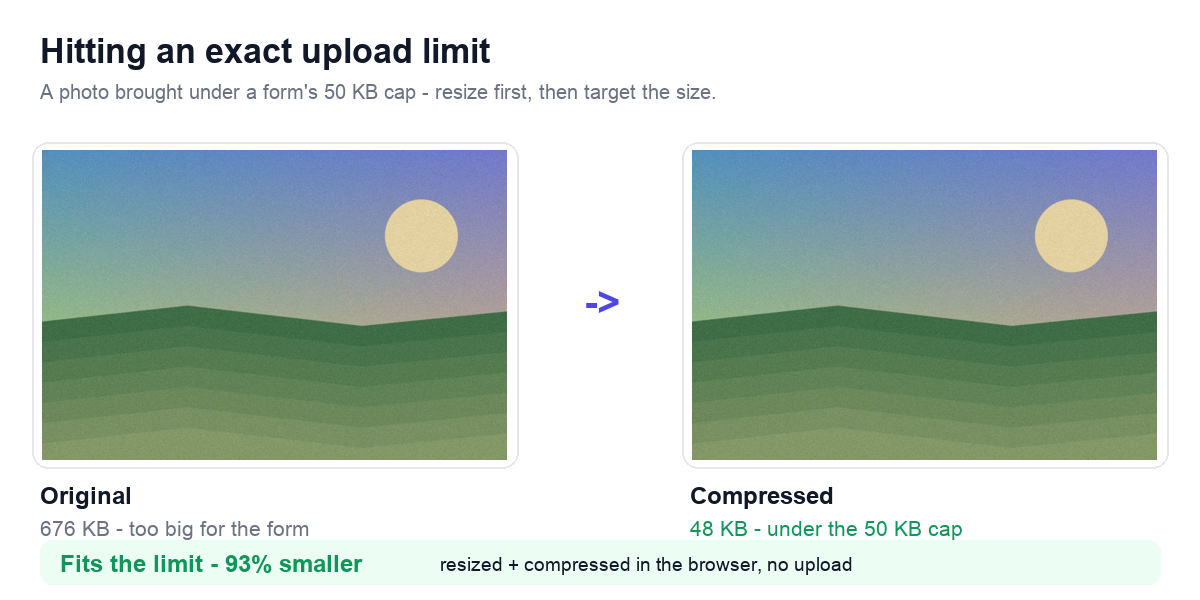
A real failure pattern: someone uploads a 4.1 MB phone photo to a visa portal that caps the file at 50 KB and demands a 413x531 px image, and the form rejects it three times. Here is the sequence that fixes it on the first try, in order:
- Crop to the required frame first — 413x531 px (the common 35x45 mm passport ratio) — with the Crop Image tool, keeping the face centered with headroom.
- Export as JPG, not PNG. A PNG of a photo will not get near 50 KB; JPG will.
- Send it through Compress to 50KB, which targets the exact ceiling instead of guessing — it landed at about 48 KB.
- Result: 4.1 MB to ~48 KB, correct dimensions, accepted. The mistake almost everyone makes is compressing the full 4.1 MB image without cropping and resizing first, which forces such heavy compression that the face turns blocky before it ever reaches 50 KB.
Related tools
Use the tools below to apply this workflow directly in your browser and finish the job without leaving the page.