Why convert PNG to JPG
- The file is too big. A photographic PNG can be much heavier than a JPG copy. Compare the actual output against the destination's file-size cap rather than assuming a fixed saving.
- The destination expects JPG. Convert only when the current upload specification lists JPG or the receiving application rejects the PNG source.
- It is a photograph. JPG uses lossy compression designed for continuous-tone images. A high-quality export may be a useful delivery copy, but inspect fine texture, gradients, and edges before replacing anything.
When not to convert: if your PNG is a logo, icon, or line-art graphic with sharp edges, or if it relies on a transparent background, JPG may be the wrong format. It can soften edges and must flatten transparency to a solid colour. Keep the PNG master, or compare a PNG to WebP delivery copy while remembering that this site's quality-controlled WebP export is lossy.
The transparency trap
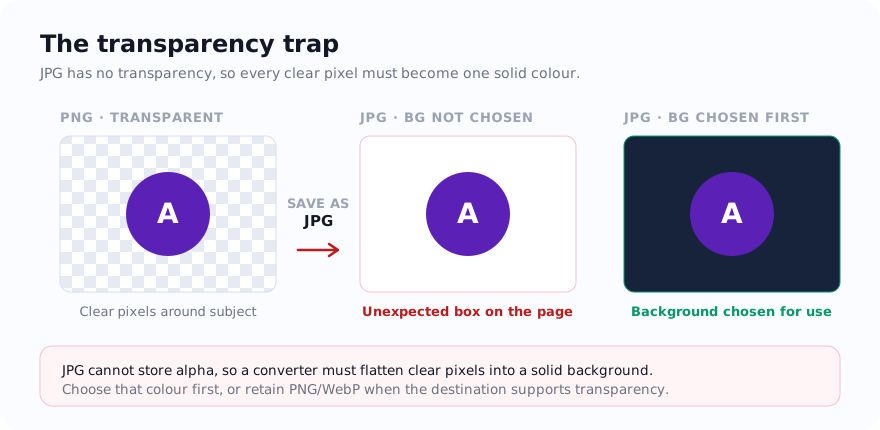
This is the single most common surprise. A PNG with a transparent background has nothing behind the subject. JPG has no concept of transparency, so when you convert, every transparent pixel has to become some colour. Choose that colour deliberately. If your logo was designed to sit on a dark header, a white-filled JPG will look broken.
The fix is to decide the background colour before converting. If you know the image will sit on white, white is fine. If it needs another colour, add that background first with Add Background, then convert — so the result matches where the image is going.
Choose the background, convert, and inspect
- Open PNG to JPG and drop your
.pngfile in. Where the browser supports the format, the selected file is decoded and converted on the device. - Handle transparency first. If the PNG has a transparent background, decide what colour should sit behind it. Use Add Background to set it, then come back to convert.
- Convert to JPG. For photos, a high quality setting can look close to the PNG at normal viewing size while reducing the file size.
- Compress further if needed. Still over an upload limit? Send it through Compress Image and set the required target size.
- Download and check the result at full size.
A worked support-ticket example
You have a large PNG screenshot that a support ticket rejects because it exceeds the listed file-size cap.
- Convert a copy to JPG and compare the downloaded byte count with the cap. A photo-like dashboard may shrink substantially, while a text-heavy screenshot may show distracting edge artifacts before it becomes small enough.
- The screenshot has some small text. Zooming in may reveal faint halos around the letters; if the text must stay razor-sharp, keep a PNG copy or compare a WebP export as well.
- Now a second case: a logo
logo.pngwith a transparent background. Convert it straight to JPG and the transparent area becomes a white rectangle — wrong for a dark website header. Instead, open Add Background, set the same colour as the header, then convert. The JPG now blends in correctly.
The example shows why the outputs must be compared: JPG may reduce file size for photo-like content, while screenshots and sharp-edged graphics can reveal compression artifacts. Set the background deliberately before converting any transparent source.
Converting a batch of PNGs
If you have a folder of screenshots or exported PNGs to convert — say a set of product shots or a stack of receipts — doing them one at a time is slow. The Compress Image and converter tools can work through several selected files in one browser session where the format is supported. A few tips for batches:
- Decide the background colour once. If every PNG is transparent and headed for the same place, settle on white or your brand colour before you start, so the whole set is consistent.
- Use the same quality setting across the batch so the images match each other in size and look.
- Keep the originals. Convert into a separate set rather than overwriting your PNGs — if you later need transparency or a re-edit, you will still have the lossless source.
PNG-to-JPG conversion problems to check
- Logo turned into a white box. The PNG was transparent and you converted straight to JPG. Set the background first with Add Background.
- Fuzzy text after converting. JPG smears sharp edges. If the image is mostly text or line art, keep it as PNG or use WebP instead.
- Still too big for the form. Convert to JPG first, then compress toward the required size limit with a tool like Compress Image.
Related tools
- PNG to JPG — the converter for this guide.
- Add Background — set a background colour before converting a transparent PNG.
- Compress Image — shrink the JPG further to hit a specific upload limit.
- PNG to WebP — compare a quality-controlled, lossy WebP delivery copy while retaining the PNG master.
How the selected PNG is handled
For supported files, the selected image is processed on the device for conversion, background changes, and compression. Ordinary page, library, diagnostic, and consent-controlled service requests can still occur; those requests do not contain the selected image for the transformation.
Use the tool: PNG to JPG — free, with selected-file processing performed on the device for supported inputs.
Related guides
Sources and verification
- MDN: Image file type and format guide — JPEG is lossy and PNG supports lossless storage and transparency.
Frequently asked questions
Will converting PNG to JPG reduce the file size?
It often reduces photo-like PNGs, but the result depends on dimensions, content, encoder, and quality. Compare the downloaded file with the source instead of relying on a fixed saving.
What happens to a transparent PNG background when I convert to JPG?
JPG cannot store transparency, so the transparent area is filled with a solid colour — usually white. If you need a specific colour behind the subject, set it with Add Background before converting.
Does converting PNG to JPG lose quality?
JPG is lossy, so some information is discarded. A high quality setting can look close for a photo at normal viewing size, while sharp text and line art may show edge artifacts. Keep those as PNG or compare a WebP export.