SVGs are vector graphics commonly used for logos and icons because their vector shapes can be rendered at different sizes without pixel-resampling blur. Embedded raster images, filters, fonts, and renderer differences can still affect the output. When a destination requires PNG, export at the intended dimensions and verify both edge quality and transparency.
Why the white box appears
An SVG with no background element is transparent by default. When a converter turns it into pixels (rasterises it), it has to decide what to place behind the artwork. A good converter leaves the empty areas transparent; a careless one paints them white "to be safe." The fix is to use PNG — which supports transparency — and a converter that does not flatten the image onto a background colour.
Rasterize the SVG and inspect the PNG
- Open SVG to PNG and drop your
.svgfile in. - Prepare the SVG dimensions before conversion. This page has no output-size control. Explicit
widthandheightvalues normally determine the intrinsic rendered size; aviewBoxdefines coordinates and aspect ratio, not promised PNG pixels. - Export as PNG. Empty areas should remain transparent when the SVG and converter preserve the alpha channel; verify the saved file against a coloured background.
- Check it against a coloured background (drop it onto a dark slide or webpage) to confirm the transparency held.

Prepare the intrinsic rendered size
When a destination specifies pixels, edit or add suitable SVG width and height values before using this converter. Do not treat the viewBox numbers alone as output pixels. Embedded bitmaps, fonts, filters, external assets, and thin strokes can still render differently, so inspect every required PNG size.
SVG rendering problems to check
- White background instead of transparent — the converter flattened it; make sure you are exporting PNG (not JPG) with transparency preserved.
- Blurry edges — the SVG may have small intrinsic dimensions, embedded raster content, or thin strokes that do not rasterise cleanly. Correct the SVG dimensions or source artwork, then convert again.
- Fonts look wrong — SVGs that rely on system fonts can shift; convert text to outlines in your design tool before exporting the SVG.
Where a transparent PNG actually gets used
Knowing the destination helps you prepare the SVG dimensions before conversion:
- App and store icons — check the current destination specification for required dimensions, shape, background, and alpha support; requirements differ.
- Website logos — prepare responsive sizes that suit the layout and display density, then test the PNG on each intended header colour.
- Slides and documents — a transparent logo drops onto any slide background without an ugly white rectangle around it.
- Email signatures and avatars — small fixed sizes where a crisp, background-free mark looks far more professional.
For each destination, set appropriate intrinsic dimensions in the SVG before conversion rather than stretching one small PNG repeatedly. Then inspect the result for dimensions, edges, fonts, external assets, and transparency changes.
Other formats and a privacy note
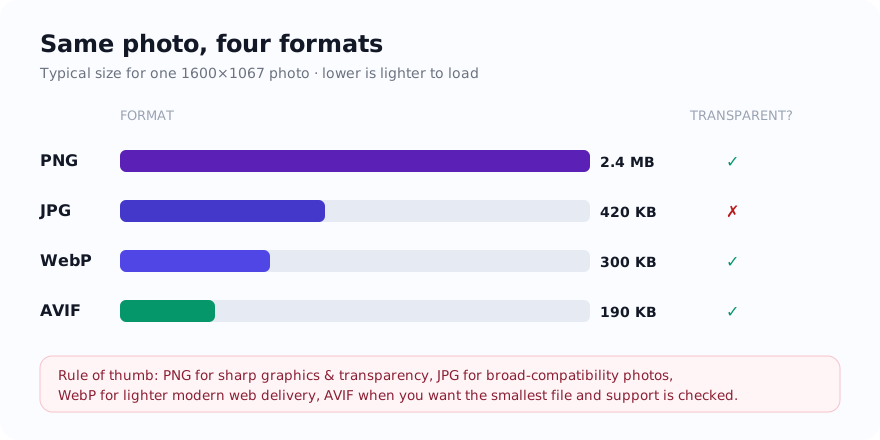
For web delivery, you can compare the PNG with a transparency-capable WebP copy, but inspect its lossy output and do not assume it will be smaller. Building a favicon? Use PNG to ICO. Where SVG decoding is supported, the selected file is rasterised on the device rather than uploaded to the site server for conversion; ordinary page, library, diagnostic, advertising, and consent-controlled requests can still occur.
Use the tool: SVG to PNG — free, with selected-file processing performed on the device for supported inputs.
Related guides
Sources and verification
- MDN: SVG — Reference material for SVG behavior and browser use.
- MDN: Image file type and format guide — PNG transparency and raster-format trade-offs.
Frequently asked questions
Why does my SVG to PNG have a white background?
The converter flattened the transparent areas onto white. Use a converter that outputs PNG with transparency preserved — empty areas stay see-through.
How do I choose the PNG dimensions?
This page has no output-size control. The browser uses the SVG’s intrinsic rendered size, normally its explicit width and height. A viewBox defines coordinates and aspect ratio rather than promised PNG pixels, so edit the SVG dimensions first when a specific size is required.
Can I keep transparency in a smaller file?
You can compare a transparency-capable WebP copy, but the byte saving and visible result depend on the artwork and encoder settings. Inspect alpha edges and fine detail, and keep the PNG when the workflow needs lossless storage of the rendered pixels.