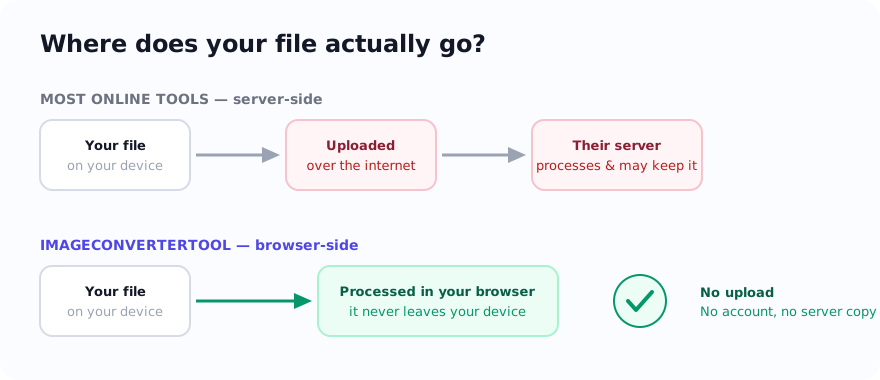
Some online compressors send the selected file to a server, while others perform the transformation in the browser. That distinction matters more for an ID scan, signature, medical document, or private photo than it does for a throwaway meme. Modern browsers can re-encode supported images on the device, so the selected file does not need to be sent to the site server for compression.
This guide explains that workflow, how to hit a specific size limit, and what you can realistically verify from the browser.
Why images are larger than they need to be
A phone photo can be several megabytes because the camera saves a high-resolution image at a relatively high quality. Whether those dimensions are useful depends on the destination: a print workflow can need more pixels than an email preview or a small form photo. Check the portal specification or intended display size first. When the source contains substantially more pixels than that destination needs, reducing dimensions and then adjusting quality can lower the file size without relying on an arbitrary universal width.
Step by step: compress in your browser
Open the Compress Image tool. For supported files, the image transformation happens locally on your machine.
- Add your image. Drag it onto the drop zone or click to choose it. The selected file is read by the browser for local processing.
- Lower the quality first. Try roughly 70–80% for a photograph, then inspect edges, faces, and text at full size. The right setting depends on the source.
- Set a max width if the destination needs fewer pixels. Use the current portal requirement or intended display size as the target. Removing surplus dimensions before compression often saves substantial bytes, but the appropriate width varies by use.
- Choose the output format. WebP is often compact for web delivery; JPG is broadly compatible for photos; keep PNG when lossless edges or transparency matter.
- Read the before/after. The tool reports the measured input and output sizes. Compare the downloaded result with the destination's stated maximum and inspect its quality.
- Download. Save the smaller file and use it.
Meeting a KB cap
If a portal sets a maximum file size — common for exams, banking, and government forms — use the target-size option in the compressor, or a focused page for the stated cap, such as compress to 50KB or compress to 100KB. Start by matching any required dimensions, then let the encoder aim at or below the cap. Encoders work with discrete quality steps, so the result may not land on one exact byte count; verify the downloaded size and leave a little margin when the portal is strict.
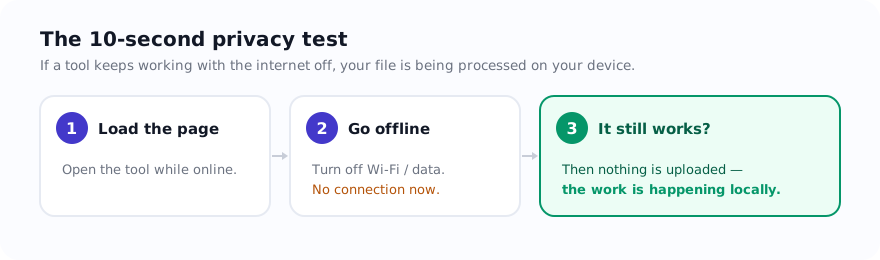
What an offline test can tell you
If a previously loaded tool completes a conversion after you disconnect, that is useful evidence that the transformation can run locally. It is not proof that the page makes no network requests while online: site delivery, consent-controlled analytics or advertising, diagnostics, and listed libraries can still create ordinary requests. The narrower claim here is that supported tools do not send the selected file to the site server for the image transformation.
Common problems and fixes
- Still over the limit. Your dimensions are probably too large. Set a max width and try again before pushing quality lower.
- The photo looks blocky. You compressed too hard. Raise the quality a little and reduce the width instead — that trade keeps detail looking cleaner.
- Transparency turned into a white box. You exported to JPG, which cannot store transparency. Use WebP or PNG instead, or pick a deliberate background colour.
- It is slow on a big batch. Browser-side work uses your own device, so very large jobs are heavier on an old phone. Try a desktop, or compress fewer files at once.
Best practices
Resize before you compress; keep the highest quality that still meets your limit rather than the smallest possible file; and keep your original safe, because compression is lossy and you cannot get the lost detail back later. For anything personal, the browser-side approach means the file is processed on your own device — which is the whole reason this site works the way it does.
Use the tool: Compress Image — free, with selected-file processing performed on the device for supported inputs.
Related guides
Sources and verification
- MDN: HTMLCanvasElement.toBlob() — How browsers create encoded image files from a canvas.
Frequently asked questions
Can I really compress an image without uploading it?
For supported files, yes. The browser re-encodes the selected image on your device instead of sending it to the site server for compression. Ordinary page and consent-controlled service requests can still occur.
What is the best quality setting?
For photos, 70–80% is a useful starting range, not a guarantee. Inspect the downloaded image at full size and use the highest quality that still fits your limit.
Why is my image still too large after compressing?
Its dimensions may exceed the current portal requirement or intended display size. If so, resize to that documented need before compressing again, then verify the downloaded byte count and image quality.